Saturday, 7 April 2012

Salvaged Timber Projects.

I'm always inspired when I see items of useful furniture that are constructed using reclaimed or salvaged materials. Many of the pieces are made using discarded pallets or scaffolding boards, stuff that most people would dump in the skip.
The following pieces would look great anywhere from a chic city pad to rustic country farmhouse and all of them have cost virtually nothing to make. With a little thought, a few tools and some reclaimed wood, you too could make some fantastic tables, shelves and benches for your home.


This coffee table is made from nothing more than a pallet and some supermarket trolley wheels. The maker has left in all the scratches and dents that pallet has gained through it's life. A lick of stain and this is ready for a tray of coffee any lounge. www.coolthings.com-pallet-coffee-table/

                    ---------------------------------------------------------------------------

You don't need to have pallets to make furniture around your home, scaffolding planks will do very nicely aswell.
Tom Robinson custom built furniture makes and supplies a range of salvaged items including this bed. Just ask yourself, what price did you pay for your last bed £200 - £300 - more likely more than that. And was it unique? Did it have a story to tell?


I have bought old boards recently and paid £10 for 5. Granted, they need a bit of work doing on them but when they are complete they look superb. Keep looking out for my scaff board coffee table in a later post.

                    ------------------------------------------------------------------------------

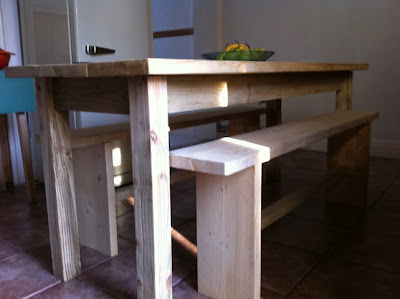
This kitchen table and benches is also made intirely from salvaged scaff boards. These planks are usually American Redwood or European Spruce. In this example, the timber has been given a lime wash after preparation to give it a clean farmhouse look.


Available from Folksy.com a UK company, they cost around £450. Not cheap but look and feel great and again, a great talking point as well as doing your bit to renew salvaged materials.

Thursday, 5 April 2012

Finally used the corks!

You may remember a few post ago I asked if you had any ideas for a bag full of corks that I had. Well the majority of the replies were in favour of a cork board. So here it is.
I've incorporated a few extra bits on there like a corkscrew and an old nutcracker.
The corks were all mounted on to a 3/4 back board of MDF and a surround of 2x1 softwood. I still have to finish the board, not sure whether to varnish the whole thing or maybe just wax the outer surround.
The board measures approx 28" x 16". Not sure if i should mount it vertically like in the picture or horizontally. I tried to make the design not only practical but pleasing to look at aswell, hence the extra pieces.
Visiting a local craft fair recently I saw the same thing but smaller for £25. The whole thing cost me about £7 (minus the wine).
This is an easy project for anyone to try and gives really nice useable results.
Give it a bash!


Tuesday, 3 April 2012

Salvage Wood Design Projects.

WoodWorks-Glastonbury
This company, based in Glastonbury make a wide range of stunning wooden furniture made entirely from recycled and salvaged materials.

Their range includes mirrors, shelves, tables, boxes, music stands and ornaments. 


Belinda-Jane Miers is the creator behind these beautiful pieces. She uses locally sourced pre-used timber,driftwood and scrap metal to create them.


Check out the site and be inspired ! ......
 http://www.woodworks-glastonbury.co.uk/

Friday, 30 March 2012

Jewellery Box

Hi again. Here is a short video showing a jewellery box I made a couple of years ago. The original design was by Steve Ramsey - the producer of 'Woodworking for Mere Mortals' website and YouTube channel.
I have a link to Steve's page here -------------- >
If you would like to make one of these I suggest you have a look at Steve's YouTube page where he posted a very comprehensive video of him making it.


The box is made from Ash, Walnut and I think boxwood.

Sunday, 3 July 2011

Gate is Finished

I don't think there was enough work in mounting the gate to warrant video, so I'll just write the main points here.
The top hinge had to be raised by about 4 inches to line up with the crossledge on the gate. This is just mounted by four screws in to a mahogany stile.

I had to drill a one and a quarter inch hole through the gate and brace to mount the lock. Originally I was unsure whether a lock designed for indoor use would stand the test of time outdoors, but the lock is probably in it's 10 or 11th year now and with just a couiple of squirts of WD40 now and again it is working fine.

On top of the door I have mounted a strip of 2x1 as a rain guard for water running on to the end grain. The wood is rebated on the bottom about three eights of an inch so it overlaps on each side.

I have also fitted a small hook and hasp latch at the top of the door as extra security if the lock is on latch. This is because we have two dogs and the kids are always leaving the gate open.

Prior to mounting the gate I left it soaking at each end overnight in Cuprinol 5 Star wood preserve. This soaked up inside the door and hopefully will provide years of protection. The rest of the gate has had a liberal brushing of the same.

Next stage is to colour the gate with a mid brown stain called fencelife. This will have to be repeated each year as the stain faids in sunlight.


I mentioned in my last video that I used a homemade door stand for planing and working on the gate. In my next post I will show some photos and instruction on how to make this handy tool.

Saturday, 18 June 2011

Ledge and Braced Garden Gate

Following my post earlier this week, here is the video showing how to make a simple ledge and braced garden gate. It's quite a long video but it covers all the relevent parts.
In a few days time I will be hanging the gate so I'll put that video up as well.
If you have any questions, drop me a line and I will help where I can.

Friday, 17 June 2011

Workmate Mountain !

Following on from my earlier B&D Workmate post: Iv'e just come across this great site! Rupert Blanchard's 'Styling and Salvage'


Rupert searches the boot sales and auction houses of the South East to find second hand furniture, storage items and general materials that he can 'hack' and turn in to really useful pieces of furniture. He uses old doors, delapidated cabinets and drawers to create some briliant results. Check out his site by clicking the image above.
What really caught my eye was his collection of B&D Workmates. He collects these second hand benches and currently has a pile of 13, nainly 625's but a couple of very early silver framed models as well.


Check out some of the recycling Rupert has done especially his fashion store refits. His work has a distinct style ...... well worth a look.