Monday 4 November 2013

Iphone camera video stabiliser. Diy project. 2013

This project grew out of my dissatisfaction with the results I was getting from videoing my other projects. I use an iPhone to film and I found that unless you have it mounted on a tripod the results are in the main unwatchable, and of course if you use a tripod then your movement is very restricted. I had seen steady cams online and on ebay but most were bulky and nearly all were expensive. I decided to make one that was small, easy to set up and cheap to make.


So was born the RetroSteady. It's handle is made from bakelite, all the fittings and gimble are stainless steel and the body is made from anodised aluminium. The iphone holder is a standard tripod mount available off ebay for a couple of pounds.


 I have a main site where I hope to sell them eventually .... www.retrosteady.com. I called them the retrosteady because I think the design and black and silver colouring looks very similar to the old film cameras of the 50's and 60's.


Check out the video on this page or search RetroSteady on YouTube for a look at how the stabilizer performs.


The screw knobs on the stabiliser as seen in these photos were all I could get hold of at first but since then I have found a company that supplies very neat thumb screws that will replace them and look less bulky.
 All in all the materials cost me about £20 ..... $30. I created a wooden form to bend the shape of the main support arm and since then have made about twenty of them.

I am currently selling this item on eBay for £39.00 in the uk. You can check it out here ....

RetroSteady on eBay     Just £39 !


Thursday 24 October 2013

How to make recycled pipework bedroom shelves. Salvaged timbers

This is a set of shelves in my sons bedroom made from recycled timber from a salvage yard and some industrial steel pipe work and fittings.


His bedroom was completely stripped ..... new plaster, new wooden flooring, completely redecorated.
The sourcing of the materials took far longer than the building of it as my son chose the rarer smaller size of 3/8 bsp for the framework.


If you would like the dimensions of the project, drop me an email and I will get them out to you.
All in all the material costs were about £130 ($200), not bad considering he now has a wardrobe, shoe rack, shelves and high level storage.


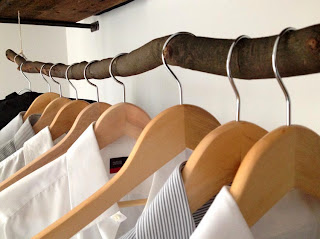
Admittedly the timber shelves do look very rough but it was the look he was aiming for and he is happy with it. The boards were power washed then left to dry for a couple of days. Then we sanded them down and finally added a coat of dark oak wax. The branch for the hangers was treated in much the same way.


Monday 8 April 2013

How to make and sell small 'Shaker Style' peg shelves.

These shelves are so easy to make. A Kreg pocket hole jig and a router are all you need to knock one up.
I have seen these sell on eBay for £25 ($35) ..... they will cost you just a couple of ££ in wood.
Watch the video and have a go yourself.
Thanks for looking in at shed projects

Wednesday 27 February 2013

Alcove cupboards and PC desk project.

This is an alcove refit I carried out in February. All in all it took about 5 days including the painting. Unfortunately I lost some of the film footage so the middle section is a bit bare. If you have any questions don't hesitate to ask. Thanks for looking.

Friday 1 February 2013

The RetroSteady ............ iPhone or small video camera stabilising device.

This is another project I am currently working on......
 www.retrosteady.com
I make these small hand held devices out of aluminium, stainless steel and bakelite.They work really well, taking out all the shakes and bumps from hand held video filming. They are really easy to make using basic tools and a few supplies.


I will be uploading a video shortly detailing how you can make one of these.

If you feel making one is a step too far or you don't have the time, no problem, I will be selling them from the website above.www.retrosteady.com


Tuesday 1 May 2012

Small DIY Project. Door support jig.

This is a small jig I built to help when working on doors or large pieces of timber and boards. I was giving a friend of mine a lift replacing 12 internal doors. This involved planing to width and fitting hinges. Without this small jig it would have been a very difficult job holding the doors while doing the work, but with it, it was an easy one man task.
The jig is made by glueing together two pieces of scrap 1" plywood and cutting out with a jigsaw. One thing to be aware of, make sure the angle on the wedge and the angle on the main body are the same, otherwise you will not get a good square grip on the door.

Wednesday 18 April 2012

How to make a Pine Country Kitchen Shelf DIY Project


This is a solid pine country kitchen shelf unit. It can be left plain with just a light oiling or waxing or it can be painted. I have made several of these and currently have two in my kitchen, you can see the colour options on the video.