

Showing posts with label shed. Show all posts
Showing posts with label shed. Show all posts
Wednesday, 18 April 2012
How to make a Pine Country Kitchen Shelf DIY Project


Saturday, 7 April 2012
Salvaged Timber Projects.
I'm always inspired when I see items of useful furniture that are constructed using reclaimed or salvaged materials. Many of the pieces are made using discarded pallets or scaffolding boards, stuff that most people would dump in the skip.
The following pieces would look great anywhere from a chic city pad to rustic country farmhouse and all of them have cost virtually nothing to make. With a little thought, a few tools and some reclaimed wood, you too could make some fantastic tables, shelves and benches for your home.

This coffee table is made from nothing more than a pallet and some supermarket trolley wheels. The maker has left in all the scratches and dents that pallet has gained through it's life. A lick of stain and this is ready for a tray of coffee any lounge. www.coolthings.com-pallet-coffee-table/
---------------------------------------------------------------------------
You don't need to have pallets to make furniture around your home, scaffolding planks will do very nicely aswell.
Tom Robinson custom built furniture makes and supplies a range of salvaged items including this bed. Just ask yourself, what price did you pay for your last bed £200 - £300 - more likely more than that. And was it unique? Did it have a story to tell?

I have bought old boards recently and paid £10 for 5. Granted, they need a bit of work doing on them but when they are complete they look superb. Keep looking out for my scaff board coffee table in a later post.
------------------------------------------------------------------------------
This kitchen table and benches is also made intirely from salvaged scaff boards. These planks are usually American Redwood or European Spruce. In this example, the timber has been given a lime wash after preparation to give it a clean farmhouse look.
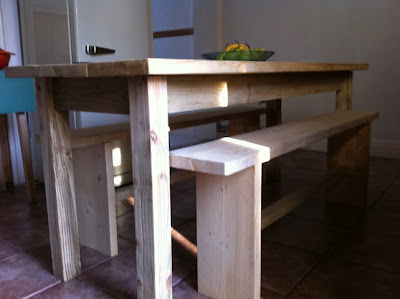
Available from Folksy.com a UK company, they cost around £450. Not cheap but look and feel great and again, a great talking point as well as doing your bit to renew salvaged materials.
The following pieces would look great anywhere from a chic city pad to rustic country farmhouse and all of them have cost virtually nothing to make. With a little thought, a few tools and some reclaimed wood, you too could make some fantastic tables, shelves and benches for your home.

---------------------------------------------------------------------------
You don't need to have pallets to make furniture around your home, scaffolding planks will do very nicely aswell.
Tom Robinson custom built furniture makes and supplies a range of salvaged items including this bed. Just ask yourself, what price did you pay for your last bed £200 - £300 - more likely more than that. And was it unique? Did it have a story to tell?

I have bought old boards recently and paid £10 for 5. Granted, they need a bit of work doing on them but when they are complete they look superb. Keep looking out for my scaff board coffee table in a later post.
------------------------------------------------------------------------------
This kitchen table and benches is also made intirely from salvaged scaff boards. These planks are usually American Redwood or European Spruce. In this example, the timber has been given a lime wash after preparation to give it a clean farmhouse look.

Available from Folksy.com a UK company, they cost around £450. Not cheap but look and feel great and again, a great talking point as well as doing your bit to renew salvaged materials.
Tuesday, 3 April 2012
Salvage Wood Design Projects.

This company, based in Glastonbury make a wide range of stunning wooden furniture made entirely from recycled and salvaged materials.

Their range includes mirrors, shelves, tables, boxes, music stands and ornaments.

Belinda-Jane Miers is the creator behind these beautiful pieces. She uses locally sourced pre-used timber,driftwood and scrap metal to create them.

Check out the site and be inspired ! ......
http://www.woodworks-glastonbury.co.uk/
http://www.woodworks-glastonbury.co.uk/
Sunday, 3 July 2011
Gate is Finished
I don't think there was enough work in mounting the gate to warrant video, so I'll just write the main points here.
The top hinge had to be raised by about 4 inches to line up with the crossledge on the gate. This is just mounted by four screws in to a mahogany stile.
![]() I had to drill a one and a quarter inch hole through the gate and brace to mount the lock. Originally I was unsure whether a lock designed for indoor use would stand the test of time outdoors, but the lock is probably in it's 10 or 11th year now and with just a couiple of squirts of WD40 now and again it is working fine.
I had to drill a one and a quarter inch hole through the gate and brace to mount the lock. Originally I was unsure whether a lock designed for indoor use would stand the test of time outdoors, but the lock is probably in it's 10 or 11th year now and with just a couiple of squirts of WD40 now and again it is working fine.
On top of the door I have mounted a strip of 2x1 as a rain guard for water running on to the end grain. The wood is rebated on the bottom about three eights of an inch so it overlaps on each side.
I have also fitted a small hook and hasp latch at the top of the door as extra security if the lock is on latch. This is because we have two dogs and the kids are always leaving the gate open.
Prior to mounting the gate I left it soaking at each end overnight in Cuprinol 5 Star wood preserve. This soaked up inside the door and hopefully will provide years of protection. The rest of the gate has had a liberal brushing of the same.
Next stage is to colour the gate with a mid brown stain called fencelife. This will have to be repeated each year as the stain faids in sunlight.
I mentioned in my last video that I used a homemade door stand for planing and working on the gate. In my next post I will show some photos and instruction on how to make this handy tool.
The top hinge had to be raised by about 4 inches to line up with the crossledge on the gate. This is just mounted by four screws in to a mahogany stile.

On top of the door I have mounted a strip of 2x1 as a rain guard for water running on to the end grain. The wood is rebated on the bottom about three eights of an inch so it overlaps on each side.
I have also fitted a small hook and hasp latch at the top of the door as extra security if the lock is on latch. This is because we have two dogs and the kids are always leaving the gate open.
Prior to mounting the gate I left it soaking at each end overnight in Cuprinol 5 Star wood preserve. This soaked up inside the door and hopefully will provide years of protection. The rest of the gate has had a liberal brushing of the same.
Next stage is to colour the gate with a mid brown stain called fencelife. This will have to be repeated each year as the stain faids in sunlight.
I mentioned in my last video that I used a homemade door stand for planing and working on the gate. In my next post I will show some photos and instruction on how to make this handy tool.
Saturday, 18 June 2011
Ledge and Braced Garden Gate
Following my post earlier this week, here is the video showing how to make a simple ledge and braced garden gate. It's quite a long video but it covers all the relevent parts.
In a few days time I will be hanging the gate so I'll put that video up as well.
If you have any questions, drop me a line and I will help where I can.
In a few days time I will be hanging the gate so I'll put that video up as well.
If you have any questions, drop me a line and I will help where I can.
Saturday, 11 June 2011
New Garden Gate Urgently Required
Follow me to see how I go on remaking the garden gate. Wet rot has set in and it really is beyond repair.

We have had it for about 12yrs now but its starting to look way past its best.
I'm going to be making a new one and upload the photos and the video on YouTube.

Thanks for looking in.
Black & Decker Workmate refit

Invented by Ron Hickman, the workmate was rejected by many companies as being not commercial enough. It was famously rejected by Stanley tools as 'Sales possibly being in the dozens'. Ron had that rejection letter framed and mounted in his office.
The workmate is superb, well, I say the workmate, I mean the original aluminium framed WM625 workmates, that were manufactured in Ireland in the 70's. They are robust, adjustable, great looking benches, something I feel the later models lack.
Originally in powder blue these workbenches sold in their millions all over the world and made Ron a multi millionaire. I own two 625's an early alluminium model and a more recent steel framed one. I use them all the time, they really are a versatile tool and I would reccommend every DIYer to get one (or two)
Originally in powder blue these workbenches sold in their millions all over the world and made Ron a multi millionaire. I own two 625's an early alluminium model and a more recent steel framed one. I use them all the time, they really are a versatile tool and I would reccommend every DIYer to get one (or two)
 |
| An early WM625 (right) and the latter all steel version. |
I bought the latter at a car boot sale for a fiver. The wooden bench tops were shot so i replaced them with solid oak jaws.
 |
| One of the damaged jaws. |
 |
| The solid american light oak jaw replacement. |
 |
| Oak WM625 bench top |
Having a pair of workmates allows you to work really long pieces of timber and also they're great as a portable working platform. Clamp a couple of planks across them and you can do indoor decorating, easily make repairs to garage gutters, tall fences and hedges etc.
Thursday, 22 April 2010
Norm's three drawer chest (With Secret Drawer)
This is my latest project. Its a softwood 3 drawer chest designed by Norm Abram from the New Yankee Workshop. He originally aired it in his season 12 episode 12 show. His version is made from cherry wood however that would be far too expensive so I'm using some softwood boards that I bought at IKEA for about £4 ($6) each.
It incorporates a box top and a secret drawer which was quite challenging for an amateur like me. The original can be seen at this link. I've just ordered some water based pine stain from a company called fiddes, I've used it before and it gives a superb natural English country pine finish. The octaganal door handles were about £1.50 each from a discounted range at a local ironmongery store called Woodfit. If you have any questions or would like to know any of the sizes, just subscribe to the blog and drop me a line.
It incorporates a box top and a secret drawer which was quite challenging for an amateur like me. The original can be seen at this link. I've just ordered some water based pine stain from a company called fiddes, I've used it before and it gives a superb natural English country pine finish. The octaganal door handles were about £1.50 each from a discounted range at a local ironmongery store called Woodfit. If you have any questions or would like to know any of the sizes, just subscribe to the blog and drop me a line.
Tuesday, 13 April 2010
Router Table (Foldaway)

As you can see, the router table is very similar in construction to the cross cut saw. Both are made from 16mm MDF, both have the single leg at the front and both are collapsible. It may not look it from the photo but I can assure you this is very sturdy and when the 1800W Freud router is spinning at full speed the table is solid.
The back edge of the table simply screws to the bench with three 40mm long, No.10 screws. Because the sides are completely free of supports it's quite easy to hold the fence in position with a couple of handy clamps.
Wednesday, 7 April 2010
Cross cut Saw (Foldaway)


Ok, I said in yesterday blog how important it is to 'save space' in your shed. When you are dealing with small spaces and lots of equipment, being able to 'knock them down' helps. These photos show you just how I achieve that with my cross cut saw. The saw is an electra beckum that is quite weighty (about 22kg)So to keep getting this out and putting it away daily is just not a practical option.
I mounted the saw on a piece of 16mm MDF that I hinged to a batton on my shed wall. At the front of the base I drilled a hole that accepts a 10mm dowel, I drilled a similar hole directly underneath in the wooden floor. Between the two is a length of 2" square wood that when fit keeps the table perfectly horizontal.
Tomorrow I will show you how I create the same effect with a router table.
Saturday, 20 March 2010
New Shed Blog
Hi.
A brief introduction to my blog.........
I've made many projects over the years in my small (8x12) shed. I hope to show you some of these on these pages and maybe inspire you to get out in to your shed and create a few yourself.
I've a few videos of the stuff I've made and I'll also post links to these on YouTube.
Most of the projects are woodwork and carpentry but as a mechanical engineer there are going to be a few welding and steel construction jobs aswell.
You really dont need a fully equiped workshop to produce some good results, like I say, my shed is only 8x12 and at times it can be tight but with planning and clever use of space it can be very productive.
The shed itself was one of my first woodwork projects and I'll cover that in a later post but inside I've made collapsable jigs and fixtures that help to make maximum use of the limited space available.
So, if you have a shed and are keen to get a few projects built, follow my blog.
Thanks for looking in. Graeme
A brief introduction to my blog.........
I've made many projects over the years in my small (8x12) shed. I hope to show you some of these on these pages and maybe inspire you to get out in to your shed and create a few yourself.
I've a few videos of the stuff I've made and I'll also post links to these on YouTube.
Most of the projects are woodwork and carpentry but as a mechanical engineer there are going to be a few welding and steel construction jobs aswell.
You really dont need a fully equiped workshop to produce some good results, like I say, my shed is only 8x12 and at times it can be tight but with planning and clever use of space it can be very productive.
The shed itself was one of my first woodwork projects and I'll cover that in a later post but inside I've made collapsable jigs and fixtures that help to make maximum use of the limited space available.
So, if you have a shed and are keen to get a few projects built, follow my blog.
Thanks for looking in. Graeme
Subscribe to:
Posts (Atom)